In my last post, I left off with photos of all of the flowers in different stages of being finished:

Stacked tiers covered with chocolate fondant... the sizes were 4 - 6 - 8 - 10 - 14 inches in diameter and most were 4 inches tall. The 8 inch tier was 5 inches tall:

Dusted hydrangea flowers and buds:

All of the flowers organized and close at hand on the day I made the cake topper and smaller arrangements. Ranunculus, peonies, hydrangea, freesia, filler flowers and lots of little buds and leaves:

Half of a Styrofoam ball that was used as the base for the topper:

The topper in progress...most of the larger flowers were in place and I was starting to add filler flowers and buds:

The completed topper with all of the flowers:

And here the leaves have been added to the base of the bouquet. The topper is almost 9 inches across:

I used my favorite chocolate brown/white stitching grosgrain ribbon around the base of all of the tiers. The original design sketch had green ribbon with white edging...but in the end, the additional color of that ribbon competed with all of the flowers, so I went with a more tailored and subtle choice...and I actually like it much better!

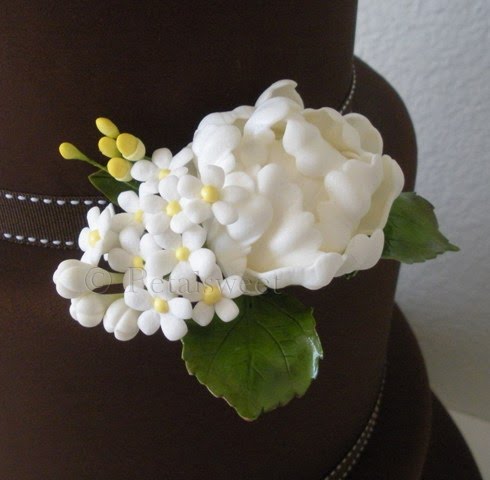
Keeping the back of the cake as neat and tidy as possible...with the exception of a few smudges:

The small arrangement for the cake:
The large arrangement for the bottom tier:

And at last...the completed cake design:

And a second view from the top so you can see more detail in the topper:

Again many, many thanks for stopping by, and for all of your wonderful comments and good wishes! And now that the convention is over...it's back to work on more flowers and some new designs...coming soon!
Copyright © 2010 by Jacqueline Butler of Petalsweet Cakes. Content of this blog (including text, photographs and layout) is the property of Jacqueline Butler - please respect copyright laws. If you want to link to my blog, or post any of my photos, please contact me - it would be great to have the opportunity to connect with you. Thank you!


15 comments:
This cake was stunning! It looked so elegant and perfect. I was lucky to see it in person too!! I've never seen something so flawless. Congratulations on an amazing cake!
Absolutely STUNNING! :)
FAN-tastic!
Your cakes always look so clean and precise. The flowers are always put together perfectly... Wow! you never cease to amaze me!
That turned out beautifully, you are obviously proud of it and should be! Excellent placement of the flowers, and it was just the right amount to make a statement. Love it!
Just gorgeous - thanks for all the sneak peeks, showing us in progress photos and all your updates. It's such a pleasure to see and read.
So beautiful, and that chocolate fondant smelled incredible! I just love those ranunculus (ranunculi?!). I'd love to see just a grouping of those together, I'd better get busy learning them!
What an amazing job you did. This cake was stunning! Thank you for sharing some pictures
O my God! You're an amazing artist!
Love your cake Jacqueline.
It's different, elegant and well,,,, just perfect.
;o)
Elin
totally awesome, the detail shot of the topper blows me away. The colour combination is perfect against the chocolate. Congratulations :)
Colors you use are classy...i have not seen people using these colors..Beautiful
How did you make the buds? I absolutely love them
Thanks so much Jedric! I just use a knife or blade tool to cut into the paste and divide it into fourths. Jacqueline
Amazing :D
Post a Comment